Ionic Compound Games: A Constructionist Approach

Students learn abstract ideas best when they manipulate models to find general relationships; eventually, they can create predictive rules for how the system behaves. They will understand the foundations of a concept best if they come to this understanding through their own mental effort.

This is why, when introducing chemical bonding, I refrain from lecture. Instead, the first day the students use wooden balls and sticks to build molecular models from different formulas (my Latin teacher is wincing; formulae is the true plural). Through this experience, students learn that subscripts on elements indicate the number of elements in the molecule.

The second day, each student uses a wonderful interactive computer game to figure out for themselves how ionic compounds are written. Here’s a screenshot of the game, and a link:

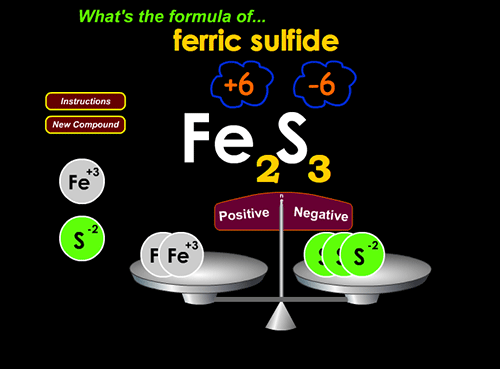
I have to say, this fellow named Fletcher over at http://www.chemfiles.com/blog/ has done an outstanding job creating this and many other online simulations. Thank you, Fletcher! I hope people support you… everybody notice the Paypal donation button? 🙂

Interspersed with a few quick mini-lessons from me, my students learn a lot about chemical formulae through this series of games. Here’s my basic plan to help students understand the basics of chemical bonding:

Day 1
Teacher input to class: I remind them how to find valence electrons, and that electron-dot diagrams only include the valence. Then they’re ready to play the first game.
1. Using your periodic table, master the 22 question quiz at http://www.sciencegeek.net/Chemistry/taters/Unit3ValenceElectrons.htm

Teacher input to class: I remind them that the valence determines the number of electrons gained or lost as the atom ionizes. “Just like a table is stable if it has four legs, an atom is stable with a complete set of eight valence electrons (except Helium).” I go through a few examples on the LCD projector in the computer lab, showing them how to find the charge of ionized alkali metals, alkaline earth metals, and halogens. Then they’re ready for the second game with this last instruction: “Students, your goal is to balance the scales using the least number of atoms possible. Ultimately, you want to be able to predict the formula by just looking at the charges of the ion. Remember, overall positive charges must equal overall negative charges for a neutral, zero charged compound.”

2. Write balanced ionic compound formulae at http://www.chemfiles.com/flash/formulas.html

Teacher input to class: For the next game, they need to know “sulfate”, “nitrate”, “nitrite”, “hydroxide”, & a few other polyatomic ionic compound names. I simply put up a list of ion formulae and names. It’s also helpful to point out that the positive and negative ions turn yellow when the computer recognizes you’ve matched them… if they’re not yellow, they’re not matched.

matching cations and anions

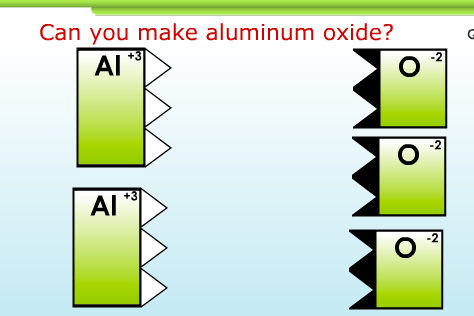
Match the prongs and valleys…


This game is valuable because it gives a graphic sense of “number of positive charges” and “number of negative charges” that need to be hooked together to balance.

3. Build ions at http://www.learner.org/interactives/periodic/groups_interactive.html

Day 2

1. Go to http://funbasedlearning.com/chemistry/chemBalancer/default.htm
Teacher input: Make sure you’ve checked the box to “show diagrams”, and start each equation with one molecule in each box. Then try to have the same number of atoms on the left side as the right side. Complete the entire worksheet that I give you in class. The law of conservation of matter must be upheld! The number of atoms in reactants equals the number of atoms in products! I have students complete the worksheet located here: http://funbasedlearning.com/chemistry/chemBalancer/worksheet.htm

I like the chemBalancer site because it shows the number of atoms changing as students change the coefficient. Here’s a screenshot:

balancing chemical equations

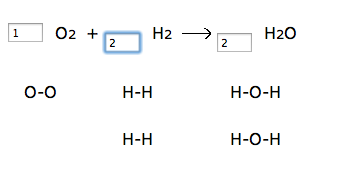
The law of conservation of matter: Mass In = Mass out

2. If students want a step-by-step tutorial on how to balance chemical equations, this site is helpful: http://www.wfu.edu/~ylwong/balanceeq/balanceq.html

3. Cap off a great day with a challenge! Win a MILLION BALANCES! http://www.quia.com/rr/100887.html

Cuddling up to Microsoft Excel

Microsoft Excel is like my fussy white cat. She’s hard not to love, but if she’s not worshiped properly she may turn against you. Go too fast, expect a hard swipe and bite.

Don't mess with me... but I *am* purr-bel-icious!

Don’t mess with me… but I *am* purr-bel-icious!


She must not be manhandled; one approaches her with appropriate reverence and respect. First, proffer the finger for sniffing; then hold finger still as she rubs her cheek against it. Only after these formalities am I allowed to get cuddly and lovie with kitty.

I love Excel for the power it has to create quick displays, and return nice results for standard deviation, mean, standard error, etc… but its convoluted ways of labeling can be so annoying! You must approach the graphs with special attention and genuflections.

Want to create a line graph? Then … certainly don’t press line graph; go to XY scatter plot and pick the icon with the curvy lines connecting the dots!

Want to create a bar graph? Then… certainly don’t press bar graph; go to column graph instead. Arrrggghhh.

If you have any tips for using Excel to create good data displays for investigations, please feel free to share them in comments below.

Onward to science fair!

Standard Deviation and Standard Error

Students looking for more advanced analysis on their science fair projects will want to understand standard deviation and standard error.

It’s fine to define measures of central tendency using mean, median, and mode, but what about the spread, or variance, of the data? A box and whisker plot very nicely shows the spread of data in the width of the box (since the box contains exactly half the data), but using standard deviation we can see much more.

Here’s a quick video going over the derivation of standard deviation:

I like to give the students some sense of where these equations come from!

Next, we have standard error. It’s helpful to run through scenario with the students where you imagine “What if we had a very, very large N? How would that affect the Error?” (denominator increasing causes the ratio to decrease – which makes sense, that a large sample size would decrease error). “What if we had a very small standard deviation? The dependent variable returned almost precisely the same value for each trial?” (numerator decreasing also causes the ratio to decrease – again, less error if there’s more consistent correlation between the independent and dependent variables.)

The next video explains how to place error bars on Excel. I don’t know why, but whenever I try to use Excel to place standard error bars according to its default settings, it doesn’t seem to be accurate. You’d think it would be, since there is the option “Error bars – use standard error” – but this option creates the same error for each of the different bars in a bar graph. In most of our science experiments, each bar is going to need its own error measurement because it represents its own set of data…

Someone else on Youtube very nicely explained how to create each bar with its own standard error bar (I’d give him credit here, but I don’t remember the video exactly!), so I used his method to create this explanation here:

Hopefully, advanced 8th grade students who want to be competitive at science fair can apply these ideas to their own data sets.

Hypothesis as Function, displayed as Trendline Equation

Annie's award-winning project is on www.sciencebuddies.org

Annie’s award-winning project is on www.sciencebuddies.org

I’ve made a video series on Youtube designed to help students analyze their independent investigation results and go beyond a simple bar graph.

Most of my eighth grade students have some notion of the general form of a slope-intercept line equation: y = mx + b.
What they don’t realize, necessarily, is that what they learned in room 309 with Mr. Math Teacher can help them a LOT in their science classroom with me!

To generate a good science fair hypothesis that can be clearly graphed, the independent variable and dependent variable need quantifiable units. That is an entire subject unto itself. Here, I’m going to focus on how I teach students to make a trendline equation once they’ve already identified their independent variable as “what goes on the X axis” and the dependent variable as “what goes on the Y axis”.

The hypothesis is really a proposal that X and Y are correlated in some sort of functional relationship. With the hypothesis, we boldly make a conditional statement “If X, then Y.” If there is a one-to-one correspondence between every X value and a Y value, so that every X returns one and only one Y value, we can say Y is a function of X.

A function can be represented in the form of a table, a graph, or an equation, and in science experiments we commonly progress through exactly those stages: first we collect data in a table, then we graph that data, then (perhaps) we create an equation from that data. Since the equation is a powerful predictive tool, it can be the most important way to summarize the data from an experiment. Of course, caveats apply: the equation may not necessarily hold for extrapolations of variables beyond the experimental set.

Students do feel proud of themselves when they discover the equation that describes the relationship between their independent and dependent variables. They are using the analytic tools of a real scientist and, let’s face it, an equation posted in the Results/Analysis section of a Science Fair display board do always look impressive.

This video playlist shows how to make a trendline equation in Microsoft Excel 2010. Other versions of Excel will be slightly different, but the discussion of finding trendlines can still be relevant:

http://www.youtube.com/watch?v=x9JMf1xD_Gc&list=PL03mSKVZUXBSqBCLe_paf-iymfEbGMokx&index=1

Enjoy!

“Only Connect”

“Only connect”, said E.M. Forster in his epigraph to Howards End. That personal connection to our students, and even more so the fleeting moments of sympathy for what is excellent in the human spirit, is the glue that bonds us to this craft called teaching.

Today I bore witness to a beautiful moment in a young person’s life… a profound moment of transition from self-despair to appreciation for inner excellence, and a life that may be forever changed.

One of my students, let’s call her Jane, had been a mournful waif all Fall Quarter. Head resting on her desk, eyes wistful as she gazed into distant worlds of her imagination, her default position presented little of the cheery goal-setting mode propounded by our School Agenda and ‘positive school culture’. I will not share what I know of her background in this public forum, but suffice it to say you’d cry mightily if you heard the details. In taking the first steps toward adulthood, Jane naturally needs a strong grounding. The search for self-identity becomes a painful exercise in regrets, uncertainty, and grief…

But today was a day of joy. She walked into class holding a large brown artists’ sketchpad and began showing something to a large cluster of students before class. Lots of “oooo-ing” and “ahhhh-ing” got my attention. In true teacher mode, as the bell was to ring in about 10 seconds, I decided to make the source of attraction the main focus for the start of class (since gee, half the class was already onto it): with Jane’s permission, I put it on the document camera.

She had made an ASTOUNDING pen and ink drawing! Very creative original designs with flowing graphic symbols merged peace symbols, musical notes, the yin-yang, and many other elements into one organic whole.

I reminded the class that they should remember they knew Jane in junior high, and be nice to her, so that when she’s a rich and famous artist when they’re 50 years old they can all try to mooch off of her. (I hope they don’t mind my sense of humor, they do laugh.) Her eyes lit up, and for the first time since I’d met her five months ago, her face literally glowed.

I asked her “So, how many years have you been drawing?”
“I did this last night.”
“Yes, but how many years have you been drawing?”
“Well, yesterday I did this,” —she shows me a tiny geometric sketch in the midst of a crumpled, scribbled math paper — “and I thought, what if I just continue this, so I did more on this bigger paper.”

So, there it was. This day, this past 24 hours, was her epiphany. Her shoulders square, she now walks with a spring in her step; I even saw her smile as she showed her work to schoolmates. What a beautiful thing, to witness a person’s first moments of justifiable pride in the dignity of inner excellence. It’s as if she were claiming her right to her place at the table of the human family; for her, this artistic skill could be the seed that begins a whole new life. What a privilege to be present for this connection.

Teaching the physics of projectile motion

Sometimes there is a bit of a gulf between what the students learn in Algebra 1 and their 8th grade physical science class. To get through problems involving position of falling objects, a physical science teacher might be tempted to give equations of motion that must be used, but may not necessarily feel like taking the time to explain the derivation of the equations.

I’m a big fan of understanding WHY an equation is the way it is, intuitively if possible, so that if forgotten, it could be re-derived from one’s basic understanding at any moment. Well, that’s the goal at least. To that end, I’ve created a four page student handout on projectile motion that I give to my “Honors” 8th grade physical science students.

It’s attached to this post, and is also available, with the free teacher’s key, here:  http://www.teacherspayteachers.com/Product/Projectile-Motion-Notes

I’ve also made a few videos on Youtube that explain these notes, so you can share them with absent students:

Hope you like it!

Let me know if you have suggestions for improvement, comments, questions, etc.

Happy New Year! Projectile MotionNotes